
Hello everyone, this is Edelweis from the Systems Department.
It has been more than six months since I moved from the Philippines to Japan to join GMO Research. The past six months have been very productive as it helped me improve my technical and even a little bit of Japanese skills.
In the past, I have worked with infrastructure creation and maintenance. It has always been my top priority to make deployment and maintenance as easy as possible. I also want other people to get to know the importance of understanding the infrastructure of a project.
From this, I came across AWS Cloud Development Kit (CDK) and Localstack. AWS CDK works like AWS CloudFormation template, but it does not necessarily need for user to remember complex functions or templates of CloudFormation. This makes management easier. Moreover, if the user has a clear knowledge of a specific programming language it would be easy to deploy resources.
You may refer to AWS CDK and Localstack official page for details of these tools. In this article, I will show how I installed and used the tools.
Using Localstack and AWS CDK I was able to deploy an API which I can use for study or investigation. Below are the steps I took to successfully do this.
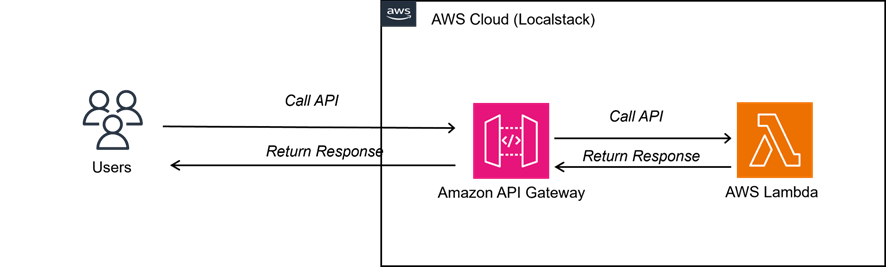
Basic Design/Architecture
The design for this report is very simple and straightforward. We will only use API Gateway and Lambda to create a sample REST API.
Environment Construction (Windows)
Localstack
1. Install localstack using python
python -m pip install localstack2. Start localstack
localstack start3. Check localstack status
localstack status servicesSuccessful installation and start of localstack will result to the following:
┏━━━━━━━━━━━━━━━━━━━━━━━━━━┳━━━━━━━━━━━━━┓
┃ Service                  ┃ Status      ┃
┡━━━━━━━━━━━━━━━━━━━━━━━━━━╇━━━━━━━━━━━━━┩
│ acm                      │ ✔ available │
│ apigateway               │ ✔ available │
│ cloudformation           │ ✔ available │
│ cloudwatch               │ ✔ available │
│ config                   │ ✔ available │
│ dynamodb                 │ ✔ available │
│ dynamodbstreams          │ ✔ available │
│ ec2                      │ ✔ available │
│ es                       │ ✔ available │
│ events                   │ ✔ available │
│ firehose                 │ ✔ available │
│ iam                      │ ✔ available │
│ kinesis                  │ ✔ available │
│ kms                      │ ✔ available │
│ lambda                   │ ✔ available │
│ logs                     │ ✔ available │
│ opensearch               │ ✔ available │
│ redshift                 │ ✔ available │
│ resource-groups          │ ✔ available │
│ resourcegroupstaggingapi │ ✔ available │
│ route53                  │ ✔ available │
│ route53resolver          │ ✔ available │
│ s3                       │ ✔ available │
│ s3control                │ ✔ available │
│ scheduler                │ ✔ available │
│ secretsmanager           │ ✔ available │
│ ses                      │ ✔ available │
│ sns                      │ ✔ available │
│ sqs                      │ ✔ available │
│ sqs-query                │ ✔ available │
│ ssm                      │ ✔ available │
│ stepfunctions            │ ✔ available │
│ sts                      │ ✔ available │
│ support                  │ ✔ available │
│ swf                      │ ✔ available │
│ transcribe               │ ✔ available │
└──────────────────────────┴─────────────┘
AWS CDK
To install and use AWS CDK all we need is to create a new and empty directory and execute the cdk commands.
1. Create new and empty directory
mkdir cdk-techblog
cd cdk-techblog
2. Install cdk
npm install -g aws-cdk-local aws-cdk3. Initialize cdklocak
cdklocal init --language pythonFor this article, I used python as my programming language. AWS CDK also supports programming languages like Typescript, Javascript, Java, C#, and Go. This also makes this tool very easy to use for everyone.
The command cdklocal init will initialize the directory where we can start creating our resources.
We will edit one file and create a new file in order to create resources.
Creating AWS Resources (Lambda and API Gateway)
Create the lambda code
Create a new directory and new file for the lambda handler.
For this project, we will deploy a very simple lambda which returns “Hello World!” every time it is executed.
File: src/lamba_handler.py
def handler(event, context):
    response = {
        'statusCode': 200,
        'body': "Hello World!",
        'headers': {
            'Content-Type': 'application/json'
        }
    }
    return response
Update the stack to create the lambda function and integrate the lambda function with the API Gateway.
File: cdk_techblog/cdk_techblog_stack.py
from aws_cdk import (
    aws_lambda as _lambda,
    aws_apigateway as apigw,
    Stack,
)
from constructs import Construct

class CdkTechblogStack(Stack):

   def __init__(self, scope: Construct, construct_id: str, **kwargs) -> None:
        super().__init__(scope, construct_id, **kwargs)

        lambda_func = _lambda.Function(
            self,
            'HelloWorldLambda',
            handler='lambda_handler.handler',
            runtime=_lambda.Runtime.PYTHON_3_7,
            code=_lambda.Code.from_asset('src')
        )

        api = apigw.RestApi(self, "HelloWorldApi")
        api_gw_resource = api.root.add_resource("test")
        api_gw_integration = apigw.LambdaIntegration(lambda_func)
        api_gw_resource.add_method("GET", api_gw_integration)
In the above code, we want to create a lambda function in Python named 'HelloWorldLambda' and an API Gateway RestAPI named HelloWorldApi. The API Gateway also has a resource named test.
Once the code for the resources is completed, we are ready to deploy.
Deploying Resources to Localstack
1. Run cdk bootstrap
cdklocal bootstrapThis command will create an AWS S3 Bucket which AWS CDK will use to deploy the stack. This command is done only once or first time deployment.
To verify that the bucket is successfully created, run the following localstack to check.
aws s3 ls --endpoint-url=http://localhost:4566This should output the S3 Bucket created like
2023-11-13 20:40:12 cdk-hnb659fds-assets-000000000000-ap-northeast-1
2. Deploy Command
cdklocal deploy Successful deployment will show the stacks created as well as confirmation that deployment was successful.
✅  CdkTechblogStack
✨  Deployment time: 10.39s
Outputs:
CdkTechblogStack.HelloWorldApiEndpointAD496187 = https://7u9zuost7i.execute-api.localhost.localstack.cloud:4566/prod/
Stack ARN:
arn:aws:cloudformation:ap-northeast-1:000000000000:stack/CdkTechblogStack/9e5b2cf2
That’s it. Using just a few commands, we were able to deploy our AWS Resources in Localstack. However, we still want to check whether the resources work like how we want them to be. So let’s test it.
Testing of Deployed Resources
In order to verify that the resources are deployed. We will use the curl command.
curl http://localhost:4566/restapis/<rest_api_id>/<stage_name>/_user_request_/<resource_name>
Using the aws cli we will get the values in order to complete the URL.
1. <rest_api_id>
aws apigateway get-rest-apis --endpoint-url=http://localhost:4566
$ aws apigateway get-rest-apis --endpoint-url=http://localhost:4566
{
    "items": [
        {
            "id": "7u9zuost7i",
            "name": "HelloWorldApi",
            "createdDate": "2023-11-13T20:45:01+09:00",
            "apiKeySource": "HEADER",
            "endpointConfiguration": {
                "types": [
                    "EDGE"
                ]
            },
            "tags": {
                "aws:cloudformation:logical-id": "HelloWorldApi9E278160",
                "aws:cloudformation:stack-name": "CdkTechblogStack",
                "aws:cloudformation:stack-id": "arn:aws:cloudformation:ap-northeast-1:000000000000:stack/CdkTechblogStack/9e5b2cf2"
            },
            "disableExecuteApiEndpoint": false
        }
    ]
}
From the output above, we can retrieve
"id": "7u9zuost7i",
This value will then be used in succeeding commands.
2. <stage_name>
aws apigateway get-stages --rest-api-id 7u9zuost7i --endpoint-url=http://localhost:4566
{
    "item": [
        {
            "deploymentId": "snr2rt92wl",
            "stageName": "prod",
            "cacheClusterEnabled": false,
            "cacheClusterStatus": "NOT_AVAILABLE",
            "methodSettings": {},
            "tracingEnabled": false
        }
    ]
}
From output above we can use
"stageName": "prod",3. <resource_name>
aws apigateway get-resources --rest-api-id 7u9zuost7i --endpoint-url=http://localhost:4566
{
    "items": [
        {
            "id": "3fihy4az23",
            "path": "/"
        },
        {
            "id": "thhe71dqtz",
            "parentId": "3fihy4az23",
            "pathPart": "test",
            "path": "/test",
            "resourceMethods": {
                "GET": {
                    "httpMethod": "GET",
                    "authorizationType": "NONE",
                    "apiKeyRequired": false,
                    "requestParameters": {},
                    "requestModels": {},
                    "methodResponses": {},
                    "methodIntegration": {
                        "type": "AWS_PROXY",
                        "httpMethod": "POST",
                        "uri": "arn:aws:apigateway:ap-northeast-1:lambda:path/2015-03-31/functions/arn:aws:lambda:ap-northeast-1:000000000000:function:CdkTechblogStack-HelloWorldLambda5A02458E-770e5667/invocations",
                        "requestParameters": {},
                        "requestTemplates": {},
                        "passthroughBehavior": "WHEN_NO_MATCH",
                        "timeoutInMillis": 29000,
                        "cacheNamespace": "thhe71dqtz",
                        "cacheKeyParameters": []
                    }
                }
            }
        }
    ]
}
From output above we can use
"pathPart": "test",
Now that we have all the values to complete the URL. We will execute the curl command.
curl http://localhost:4566/restapis/7u9zuost7i/prod/_user_request_/test Successful response displays “Hello World” on the screen.
curl http://localhost:4566/restapis/7u9zuost7i/prod/_user_request_/test
  % Total    % Received % Xferd  Average Speed   Time    Time     Time  Current
                                 Dload  Upload   Total   Spent    Left  Speed
100    12  100    12    0     0    139      0 --:--:-- --:--:-- --:--:--   139
Hello World!
That’s it! We were able to confirm that the resources are deployed and connected.
Conclusion
With the increased demand for cloud technologies nowadays it is ideal for us developers to understand how we can use, deploy, and maintain infrastructure. In this article, I showed how to use two of the easiest and well-known tools for deployment that are AWS CDK and Localstack. From this, we can explore more of the advanced and new tools that are coming out. With the help of these simple tools I hope everyone can have a wider understanding of how important knowledge of infrastructure is for a project.
That is all, thank you! 😀
【References】


